8 Tips and Tricks for the new WordPress Editor called Gutenberg
The new Gutenberg editor arrived as part of WordPress 5.0, which was released on November 27, 2018. It is becoming a better release after release and now, end-users without technical knowledge can use it easily.
More and more functionalities are added with each WordPress core update. So here are the 8 tips and tricks that can help you to better use this new tool.
Please note that the Gutenberg editor is using “blocks” to display your content. You can have a heading block, image block, list block, quote block… etc.
You can also add plugins to have more blocks available like Gutenberg blocks or Kadence Blocks. Both are free to use and add a lot of design possibilities. But the tips and tricks only cover the basic blocks that you can find in your WordPress installation.
1. Display in fullscreen mode
Usually, when you are in the edit mode with Gutenberg, you get the fullscreen editor experience but, if for some reason you are not seeing it, you can restore it easily. In the top right corner, click on the 3 dots and click on “fullscreen mode”.
Note at the end the icons? They represent the combination of keys you can use to switch to this mode as well.

2. Quickly add one of the last blocks you used
Gutenberg editor is offering a quick way to add one of the last blocks you used: just hit the slash key “/” and it will offer you a list of the last blocks. Simply click on the one you want to use…

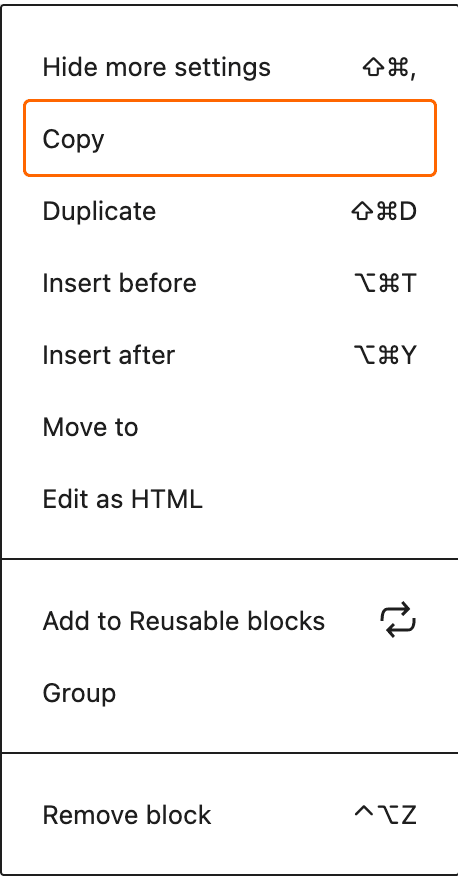
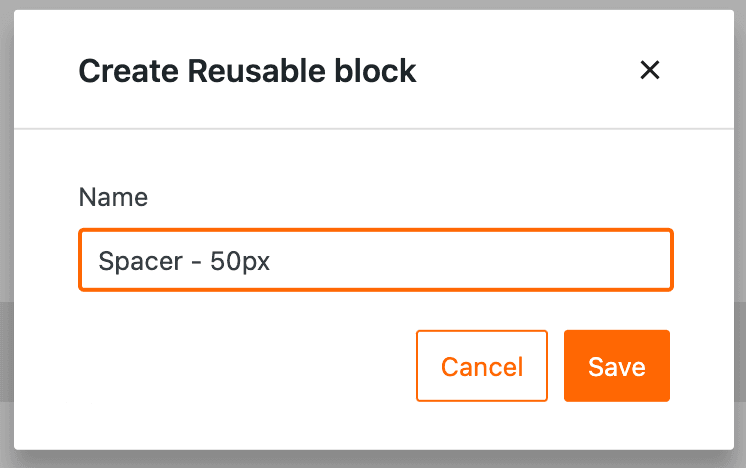
3. Create a reusable block
Let say that you have a block that you are using a lot on your site, a good example will be a spacer between your paragraph like in this post. We are using a spacer of 50 px between paragraphs and since we are going to have 7 of them, we want to reuse this block quickly and knowing that the default spacer block is 100 px, it makes sense to create one that is only 50 px. Simply go over the block, click on the 3 dots, click on “Add to Reusable blocks”, a new popup will appear, give a name, and hit save. Voila! You have now a block that you can reuse everywhere on your site.

4. Call a block quickly with character combinations
There is a series of character combinations you can use to quickly call a block.
##(2 hash signs then a space) – will create a block as anH2heading block. Type in more pound signs to create smaller headings, for example####(4 hash signs) will create anH6heading block.*(asterisk then a space) – will create a bullet list block1.(number one, a period then a space) – will create a number list block>(greater than sign, then a space) – will create a blockquote block---(3 dashes, then enter) – will create a horizontal rule block`word`(backtick, some characters, then another backtick) – will create a inline code block```(3 backticks, then enter) – will create a preformatted text block
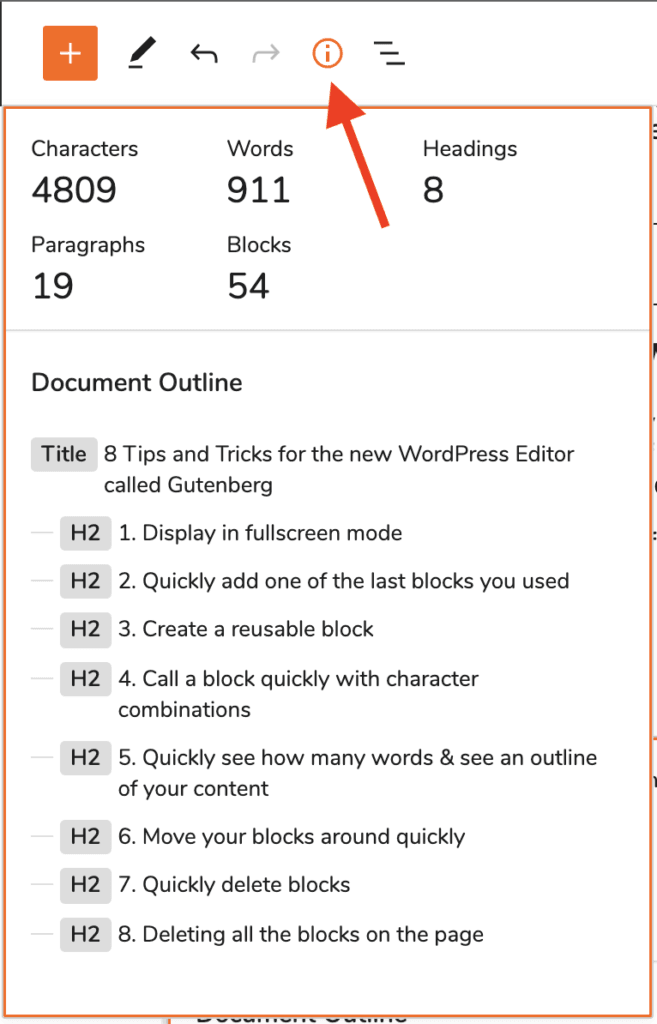
5. Quickly see how many words & see an outline of your content
This one is very helpful! You can quickly see how many words you have on your blog post or page. Very helpful for SEO but also, you can see the outline of your content with any H2, H3 or more that you are using. It helps you to see how your content is organized and you can use the tip below to change it.
Simply click on the “i” icon at the top left of your editor. It will display all information regarding the content of your post or page.
6. Move your blocks around quickly
Following the tip above, you can quickly move your blocks around. Simply go over the block you want to move, 2 arrows will be available, up, and down depending on which direction you want to move it.
For example, if you want to move this block up, click on the ^ icon and it will move before the previous block. Easy, right?

You can also click on the “6 dots icon” (left of the arrows) to drag and drop your block anywhere. I found this method less precise than using the arrows.
7. Quickly delete a block or its content
There are multiple options to quickly delete blocks:
- Click on a block to highlight it, then hit delete key to remove it.
- While typing text inside a text block, hit CTRL + A on a PC or CMD + A on a Mac to highlight all the text, then hit delete two times.
- To delete multiple blocks, hold your Shift Key then select the first one, then, click on another until you selected all the one you want to delete. Hit delete to remove them completely.
Made a mistake? Just hit CTRL + Z (PC) or CMD + Z (Mac), your last action will be cancelled, and all blocks will be back.
8. Deleting all the blocks on the page
Following the previous tip, you can simply delete all the blocks on the page by pressing CTRL + A on a PC or CMD + A on a Mac then hit the DELETE key and it will delete everything. Be sure to click outside of a block before pressing those keys.
Remember to hit CTRL + Z (PC) or CMD + Z (Mac) if you made a mistake. Your last action will be cancelled and all blocks will be back.
I hope you enjoy this tips and tricks for the Gutenberg editor. Feel free to contact us if you need help with your WordPress website. Always happy to help.